Secure Boot on Raspberry Pi 4
This page explains the bootloader authentication and secure boot setup for the
Raspberry Pi 4.
References:
Acronyms:
- CUSTPBK: Customer Public Key
- CUSTPVK: Customer Private Key
- BL2: Boot Loader stage 2, in the EEPROM, contains the pieeprom binary, its configuration, the configuration signature and CUSTPBK
- BL3: Boot Loader stage 3, in the SD card, contains
boot.imgandboot.sig, its signature - PBKH: Public Key Hash (SHA256 of CUSPBK)
Raspberry Pi 4 Secure boot Overview
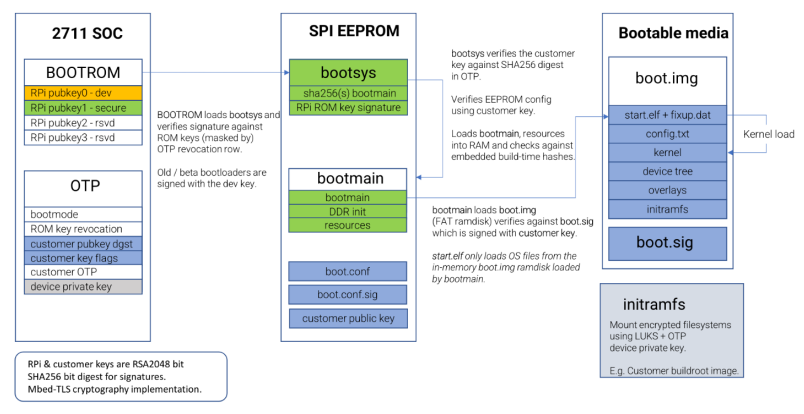
The SoC contains some proprietary keys from Raspberry that authenticate bootsys and bootmain. It also contains OTP to store the customer PBKH to authenticate the EEPROM configuration file and the content of the SD card.
The SD card must contain a vfat boot partition which itself contains two files
called boot.img and its signature boot.sig.
boot.img is a vfat image of the original Raspberry Pi boot partition and
contains all the bootfiles (start.elf, config.txt, cmdline.txt...), the
DTBs and their overlays and the U-Boot binary (referred to as kernel in the
image above).
Secure boot stages
The secure boot process involves multiple stages of verification. It begins with the ROM code and continues through the loading and execution of all bootloader firmware components.
Throughout all authentication and signature processes, we use RSA-2048 key
pairs (2048-bits) and SHA-256 for hash computation.
-
BL2:
-
Assets contained in BL2:
- bootloader code
- bootloader config (and signature)
- CUSTPBK
-
Authentication:
- The ROM code authenticates the bootloader code using the proprietary keys stored in the SoC.
- The ROM code starts the bootloader code.
- BL2 authenticates the CUSTPBK using the PBKH stored in the OTP fuses.
- BL2 authenticates the bootloader config using CUSTPBK.
-
-
BL3
-
Assets contained in BL3:
boot.img(and signature)
-
Authentication:
- BL2 authenticates
boot.imgusing CUSTPBK.
- BL2 authenticates
-
-
BL2 starts BL3 (start.elf, ..., U-Boot)
Setting up your Secure Boot
This section will guide you through the process of building and running an image with secure boot.
It is assumed the following context:
- Raspberry Pi 4B
- Default Welma partition layout
- Default Welma development keys used in the Yocto build
- Production keys owned by a separate entity (other than the development team)
Building your Image
Welma requirements:
-
machine.conf:
- Set
BOOT_SIGNING_MECHANISM = "raspberrypi"(this is the default)
- Set
-
In
local.conf- Activate secure boot by defining
WELMA_SECURE_BOOT = "1"(this is the default) - Adjust or keep the default values for
WELMA_KEY_SWK1_PUBandWELMA_KEY_SWK1_PRIV
- Activate secure boot by defining
-
u-boot:
- Disable the U-Boot command line or restrict its access by a password (not done in Welma), because it would allow an attacker to bypass the secure boot mechanism.
-
In SYSRO and APPRO: have your programs not start other programs located in SYSRW, as this filesystem is not covered by secure boot. Keep in mind that
/homeis located in SYSRW and make sure that files such as~/.profile,~/.bashrc, etc. do not get executed automatically if they were created by an attacker.
Signing your Image with Production Keys
Input:
-
Generated by the build:
- BL2 Firmware
- BL3 boot image
- fitImage (BOOT)
- .verity images (SYSRO, APPRO)
-
Production Keys: SWK1.priv, SWK1.crt
Output (signed images provisioned with necessary public keys and certificates):
- BL2 Firmware
- BL3 boot image
- BOOT vfat partition
- SYSRO and APPRO verity partitions
Steps:
- Inject
SWK1.crtinto DTB- Mount
boot.imgusing a loop device - Create the Device Tree Overlay containing SWK1:
- Copy the DTBO in the
overlaysdirectory - Unmount the directory
- Mount
- Sign BL2
-
Sign fitImage:
- Create the BOOT partition (vfat) populated with the signed fitImage, using
mkdosfs&mcopy
- Create the BOOT partition (vfat) populated with the signed fitImage, using
-
Sign .verity images:
Install Secure Boot compatible BL2
To enable secure boot, you need to flash a different BL2 that authenticates your
bootable media. This new BL2 is created during the build and signed with
CUSTPVK. To flash your Raspberry Pi, you need a SD card with only these files,
available in the deploy dir:
pieeprom.binpieeprom.sigrecovery.bin
On your PC from the build directory:
- mount the first vfat partition of your SD card to
path/to/SD - erase all files
- copy the files
Then on the Raspberry Pi:
- insert this SD card
- power on
- wait either for the green LED to blink rapidly or the screen to fill in green (if you have a HDMI-connected screen) to confirm the BL2 update
Fusing your Products
-
Disable JTAG
Offline signing of BL2 and boot image
In order to sign BL2 and boot image, you need two Raspberry scripts in your
PATH: rpi-eeprom-config, rpi-eeprom-digest. These scripts are accessible
in this Github repo.
BL2 signing
DEPLOYDIR=tmp/deploy/images/$MACHINE
welma-signing-tools/raspberrypi4/rpi-sign bl2 $DEPLOYDIR/pieeprom.bin \
    path/to/public.pem \
    path/to/private.pem
Boot image signing
DEPLOYDIR=tmp/deploy/images/$MACHINE
welma-signing-tools/raspberrypi4/rpi-sign bootimg $DEPLOYDIR/boot.img \
    path/to/private.pem
Burning the eFuses
- Prerequisites
- Erase the EEPROM (Raspberry Pi 4B/400 only)
- Define the RPIBOOT GPIO (Raspberry Pi 4B/400 only)
- Write the PBKH
Prerequisites
OTP provisioning needs the RPIBOOT utility, which let you boot the board using a USB connection. You can clone it using the repo usbboot.
To create the rpiboot binary, run:
Create a directory to work with and copy all the useful files
mkdir work
cp firmware/2711/recovery.bin \
    secure-boot-recovery/bootcode4.bin \
    secure-boot-recovery/config.txt work
Add pieeprom.bin and pieeprom.sig from the Yocto deploy directory
Erase the EEPROM
In order to avoid the RPIBOOT OTP being accidentally set on Pi 4B/400 this option can only be set via RPIBOOT. To force RPIBOOT on a Pi 4B/400, we need to erase the SPI EEPROM using a SD card.
- go in your
workdirectory - mount the first vfat partition of your SD card to
path/to/SD - erase all files
- add
erase_eeprom=1toconfig.txt - copy
recovery.binandconfig.txt
Then on the Raspberry Pi:
- insert this SD card
- power on
- wait either for the green LED to blink rapidly or the screen to fill in green (if you have a HDMI-connected screen) to confirm the erasing.
Now you can use RPIBOOT once to program the GPIO to use for future RPIBOOT.
Define the RPIBOOT GPIO
Warning
These commands are writing to One-Time Programmable (OTP) eFuses. Be absolutely certain that you want to write to the OTP before running these commands. Once written, the data cannot be changed or erased.
Raspberry recommends to choose GPIO 8.
- go in your
workdirectory - edit
config.txtto program the GPIO, you can comment the other lines - start
rpiboot - connect a cable between the USB-C power supply port from the
board to a USB from your PC. You can see the logs in UART:
  5.43 Read config.txt bytes     1868 hnd 0x0
  5.45 Updating OTP to use GPIO8 to enable USB-device boot (rpiboot)
  5.35 pieeprom.sig
  5.35 hash: 054e271515554d4328691f29c41cf76967f7fd05c8ade25304c81b5f2cfce56a
  5.36 ts: 1754990568
  5.63 Reading EEPROM: 524288 bytes 0xc0b60000
  6.96 630ms
  6.42 Writing EEPROM
********************************************************************************************************************************  7.78
  7.81 1438ms

  7.81 Verify BOOT EEPROM
  7.82 Reading EEPROM: 524288 bytes 0xc0b60000
  8.32 645ms
  8.86 BOOT-EEPROM: UPDATED
  8.59 USB-OTG disconnect
  8.90 RECOVERY: COMPLETE: REBOOT 0
Now, if you put a jumper like on the picture below, your board will boot on RPIBOOT instead of the SD card:
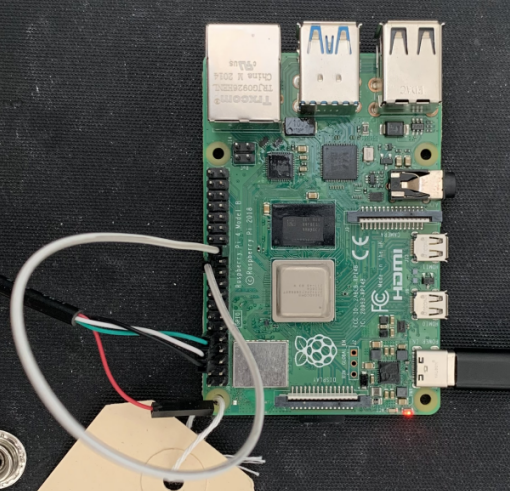
Here we use GPIO 8 connected to the ground with the white jumper and GPIO 14, 15 and ground to read serial.
Write the PBKH
Warning
These commands are writing to One-Time Programmable (OTP) eFuses. Be absolutely certain that you want to write to the OTP before running these commands. Once written, the data cannot be changed or erased.
- go in your
workdirectory - edit
config.txtto program the OTP, you can comment the other lines - connect the GPIO to the ground using a jumper
- start
rpiboot - connect a cable between the USB-C power supply port from the
board to a USB from your PC. You can see the logs in UART:
  5.17 Read config.txt bytes     1867 hnd 0x0
  5.22 pieeprom.sig
  5.22 hash: 054e271515554d4328691f29c41cf76967f7fd05c8ade25304c81b5f2cfce56a
  5.22 ts: 1754990568
  5.30 Reading EEPROM: 524288 bytes 0xc0b60000
  6.63 630ms
  6.16 Bootloader EEPROM is up to date
  6.21 secure_boot_provision program_pubkey 1
  6.22 bootconf.sig
  6.22 hash: d7c7f93ddb4805ddd847c358e4e4770c68a2e5dcd0448f2352128b8cf4b58957
  6.22 rsa2048: 8e86e0ac94afa6c03bdb61c718ba6b0d4d0858e9f14ea890873f4621320e391df4e43f51e10a7cfa1ecc184d111a013a1f41fa52874fdf3c65d9295c3e3ad9450e4ffcc3449dadd6d09ecb699a15bc6224c31c69924e7601c3e38f8ba9b2c015900328361d95eb305285c561c1751a72ae70e3f2da27639f41a571e6aa78bbd4e14e5264292b70d71fd82e49be72579226ca1ced9e2eb0e79653c071a3de5f22c22171186e0c9c543974e98608b59d99b7602699fa0a122629f1092d65407238b30505eb90f21708fef188451647ab9855664346e3ec6fc2c64f6ae9c20bc835d58f6f756c17ce9e10d0edafd804ebd950d2cddfaa6c58c32a55e4eac9841c93
  6.27 RSA verify
  6.10 rsa-verify pass (0x0)
  6.10 Updating OTP to use GPIO8 to enable USB-device boot (rpiboot)
  6.31 Public key hash b6038838aedb25f9ecf268e94b3226f578b52a579cb839a2a0ac1badafda0298
  6.32 OTP-WR: boot-mode 000048b0
  6.32 OTP-WR: boot-mode 000048b0
  6.33 OTP-WR: flags 00000080
  6.33 Write OTP key
  6.36 OTP updated for key b6038838aedb25f9ecf268e94b3226f578b52a579cb839a2a0ac1badafda0298
  6.36 USB-OTG disconnect
  6.68 RECOVERY: COMPLETE: REBOOT 0
Secure boot is now enabled on your Raspberry Pi! To update the BL2, you must now use RPIBOOT and it will only boot if the configuration file is signed with your CUSTPVK.
Test cases
The following test cases are designed to verify the secure boot process. The main objective is to ensure that there are no authentication error in BL2 or boot image and that it doesn't boot if one of them is corrupted.
BL2 and boot image signed with matching keys
When BL2 and boot image are signed with the keys corresponding to the PBKH fused, a notice message is displayed:
  1.41 OTP boardrev b03114 bootrom 48b0 48b0
  1.41 Customer key hash b6038838aedb25f9ecf268e94b3226f578b52a579cb839a2a0ac1badafda0298
  1.41 VC-JTAG unlocked
  1.45 bootconf.sig
  1.45 hash: d7c7f93ddb4805ddd847c358e4e4770c68a2e5dcd0448f2352128b8cf4b58957
  1.45 rsa2048: 8e86e0ac94afa6c03bdb61c718ba6b0d4d0858e9f14ea890873f4621320e391df4e43f51e10a7cfa1ecc184d111a013a1f41fa52874fdf3c65d9295c3e3ad9450e4ffcc3449dadd6d09ecb699a15bc6224c31c69924e7601c3e38f8ba9b2c015900328361d95eb305285c561c1751a72ae70e3f2da27639f41a571e6aa78bbd4e14e5264292b70d71fd82e49be72579226ca1ced9e2eb0e79653c071a3de5f22c22171186e0c9c543974e98608b59d99b7602699fa0a122629f1092d65407238b30505eb90f21708fef188451647ab9855664346e3ec6fc2c64f6ae9c20bc835d58f6f756c17ce9e10d0edafd804ebd950d2cddfaa6c58c32a55e4eac9841c93
  1.50 RSA verify
  1.20 rsa-verify pass (0x0)
  .
  .
  .
  2.83 secure-boot
  2.85 Loading boot.img ...
  2.38 boot.sig
  2.38 hash: 159da5e8db9e7b64c80d9058a644231e49133f3cad62a0d1b1d9ceabbb382173
  2.39 ts: 1302044400
  2.39 rsa2048: 5c3b8b1d13d68598d8a36aefcfc901e1d558d960811bf211758090cea340c66ee7d96e63c198fb700ce726c3f35ec96467870b161ab1ed098d279a830adb4ee3056051e068f2bba6f0e0dce9897910b19da8bfa0d3feca5fcbf55bd022bcc1631740263f0d014600eea60b29abb94c8fa10e2369b3a02502f7325f202f83d49aa64f57d3391398214d5256e36abbe1edaaf2b93b569e2191951b0b374d30a76cca849fe84672b92f068da2aa3ecf844f44530087f50545bd6d07d9de571bbd23ce77f9ff20eeb5c4d57e46215c421351182c824c531ccdf813783e096c558251b1e2053fc162f2e2d9d2643aaff4dc161f76083eaffee9a87cc49dfe45ff008e
  3.13 Verifying
  6.27 RSA verify
  6.83 rsa-verify pass (0x0)
CUSTPBK mismatch (BL2)
If an installed BL2 doesn't contain the right public key according to the PBKH in the OTP:
  1.41 OTP boardrev b03114 bootrom 48b0 48b0
  1.41 Customer key hash b6038838aedb25f9ecf268e94b3226f578b52a579cb839a2a0ac1badafda0298
  1.41 VC-JTAG unlocked
  1.50 EEPROM RSA key mismatch b6038838aedb25f9ecf268e94b3226f578b52a579cb839a2a0ac1badafda0298 5a7a19896b5833df1ea6a4041500477ccffb063cb38cc0ab5e382d77bd1f2dec
  1.46 Customer public key not loaded.
  1.64 Failed to validate bootconf.txt
  1.46 USB-OTG disconnect
  1.70 BOOT ERROR: code 24 - 'File signature or hash mismatch'
boot.conf authentication error
  1.41 OTP boardrev b03114 bootrom 48b0 48b0
  1.41 Customer key hash b6038838aedb25f9ecf268e94b3226f578b52a579cb839a2a0ac1badafda0298
  1.41 VC-JTAG unlocked
  1.45 bootconf.sig
  1.45 hash: 4c57c85f53f17d63d829b34192f049c2a96bb12a7f11a03d04aa58913c3f9ba1
  1.45 rsa2048: 456ac20af13454c2b6c2e5fed37fdaf5886fc35cd54e83873a20335114b99688cc3e2a09ff4d0457cb4376e76149548ee44d65b4678e45356c8eab1abea6257b5f9dd19a6ed593b9ffcff74093873cb6ca4203ca7422df183632826b201f6d1d9b7f13d3f4f40ba93cd09a2fb7d47097b298eb73e86f855e8d3629ad5972b5420ddb7cf9b0e5e2296cd25431c940ab7e134193779380f2660dc09716852e33a0989b8382301e8f950f1426f3ab4272cbdcda376cea5846fed7183fa58f5971ef5dc3ab5031095aa607ad76660c969651de38906335f0d3423dcfe0c19601a3ab1fe807d78a9a439bc515c1aa9bb7699a411c91641103e8391faa505c655027c4
  1.04 bootconf.txt mismatch
  1.06 bootconf.txt hash mismatch b503f8ad7f8aea93a272a5ba5248cc5222d0c55af28a4345d0a496bdba9d16bf
  1.14 Failed to validate bootconf.txt
  1.51 USB-OTG disconnect
  1.20 BOOT ERROR: code 24 - 'File signature or hash mismatch'
Bad signature of boot.img (BL3)
  2.18 secure-boot
  2.20 Loading boot.img ...
  2.32 boot.sig
  2.32 hash: 159da5e8db9e7b64c80d9058a644231e49133f3cad62a0d1b1d9ceabbb382173
  2.33 ts: 1755089692
  2.33 rsa2048: 6f31796bfe93cb3807cb26fe5faca40e26f9bed7b465625fba8013f48fe9de04046509c1a612772d7065bd3d6ddfa048702cd0207c2cd31d582e09a3f6af0b1c5f3dd2da8f7d23794e26ac46a12bf27d2ef4e05f3c16267f8460e6bfede7bd5161e81268489d78c5777a232fd358197d46fbba0d44948972fab2e1da4b740520a55657b6225c90febb8d47e85578fe470cd7622ba01caebeb6538b2650715692cadbcadbdcdfe31aa2fb9ec9a796f90454ec9276a984f84cf33352eb233554d67f8435552a28c3373fc9feb3b6937a9f07133029f06f8900a2b65630be8a382a35183196e4c912872c3dce4985979bc599f6f6f28347b18d84434ac7f4abfc89
  3.47 Verifying
  6.10 RSA verify
  6.13 rsa-verify fail (0x4380)
  6.13 RSA signature not verified
  6.31 Bad signature boot.img
  6.62 Error 12 loading boot.img