How to Use meta-welma
This page provides a step-by-step guide to use meta-welma in your Yocto
build environment:
- Set up your Yocto build workspace
- Initiate your image recipe
- Customize your build
- Use a top-level manifest repository
We assume in this page that your project is named your-project and has one
application your-app running on Linux, on a
machine supported by Welma.
Set up your Yocto build workspace
We recommend organizing your workspace by separating your layers from your build directory, as follows:
layers
├── meta-project
├── meta-welma
├── poky
├── meta-openembedded
└── ...

build
├── conf
└── ...
This adheres to the Yocto standard layout and facilitates updates and maintenance of the distribution.
Set up conf/bblayers.conf
Add in BBLAYERS:
##OEROOT##/../meta-welma- Other needed layers for your project
Set up conf/local.conf
MACHINE: Select your machine (one of the machines supported by Welma)DISTRO: Selectwelma
Workspace helper script: setup-build-env
We recommend keeping bblayers.conf and local.conf under Source Code
Configuration (SCM), so that all your developers share a common reference.
You can create templates for these files to make versioning and reuse easier.
These templates act as a starting point when referenced with
the TEMPLATECONF environment variable:
bblayers.conf.sample  # Default bblayers.conf file
local.conf.sample     # Default local.conf file
conf-notes.txt
The script meta-welma/setup/setup-build-env uses these templates
to set up the build environment.
For example, this command will setup the build environment using the
configuration template your-template from meta-project:
Usage information for setup-build-env:
Usage: source setup-build-env [-b BUILD-DIR] [TEMPLATECONF ...]

Arguments:
    TEMPLATECONF    Directory with the templates of bblayers.conf,
                    conf-notes.txt, local.conf (Same as Yocto's TEMPLATECONF).
                    If multiple TEMPLATECONF are given, the files are
                    concatenated.

    -b BUILD-DIR    Directory where the artefacts shall be built
                    (default: build).
Create your image recipe
In this section, we show how to set up 2 image recipes:
- A production image
- A development image
Production Image
Create a new production image recipe based on welma-image:
| meta-project/recipes-your-project/images/your-project-image.bb | |
|---|---|
In this recipe:
inherit welma-image: Declares your image as based on WelmaIMAGE_INSTALL += ...: Should be edited to insert the packages needed in your image
Development Image
For developers and testers, create another image recipe based on the production image, with more tools:
| meta-project/recipes-your-project/images/your-project-image-dev.bb | |
|---|---|
The resulting image will have an interactive bootloader, a root login access and tools to inspect manually how embedded software is working.
Customize your build
Customize your image:
- Customize your partition layout
- Enable software updates by setting
WELMA_UPDATEinlocal.conf, to your preferred tool- Update
bblayer.confaccordingly
- Update
Activate CVEScan:
- In
local.conf: Activate CVEScan InventoryINHERIT += "cvescan-inventory"
- In
bblayers.conf: Add CVEScan meta-layerBBLAYERS += "##OEROOT##/../meta-cvescan/meta-cvescan"
Use a manifest repository
The manifest repository stores the repositories and branch/tag/commit used for each of your software releases. This participates to uniquely identify how the release was built, and make it possible to rebuild it.
Example of a Manifest file usable by the welma-manifest/setup-download script:
# NAME                 URL                                                         REF
poky                   git://git.yoctoproject.org/poky                             kirkstone-4.0.5
meta-openembedded      git://git.openembedded.org/meta-openembedded                50d4a8d2a983a68383ef1ffec2c8e21adf0c1a79
meta-welma             git@gitlab.com:witekio/rnd/theembeddedkit/welma/meta-welma  kirkstone-1.0
meta-project           git@example.com/your-project                                v1.0.8
meta-supported-machine git://...                                                   ..
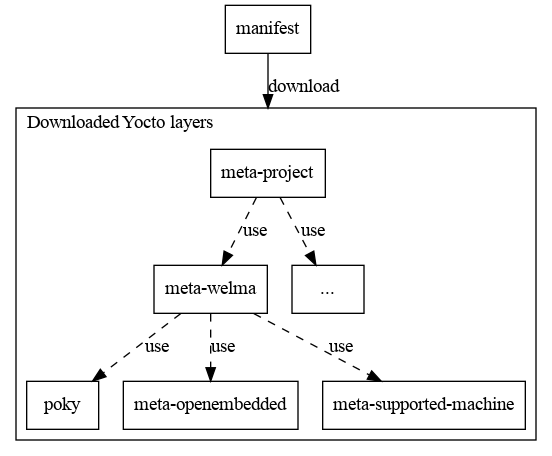
The script welma-manifest/setup-download will download these repositories in
the current working directory.
Dependencies diagram: