AWS infrastructure usage
This infrastructure is one of the ways to handle your Yocto builds in the cloud. We are using Gitlab runner and AWS autoscaling capabilities to have an infrastructure adapting to the needs.
You can find the project to build the infrastructure here.
This page gives guidelines on how to set up the infrastructure to handle CI jobs:
To get details on how the infrastruture works, see the overview page.
Automated deployment (Recommended)
AWS account setup
Create an identity provider
- Go to the IAM dashboard by searching
IAMin the searchbar - Click on the
Identity providersection in the left sidebar under Access management - Click on the
Add a providerbutton in the right top right corner - Complete the following information
Provider type:
OpenID ConnectProvider URL:https://gitlab.comAudience:https://gitlab.com
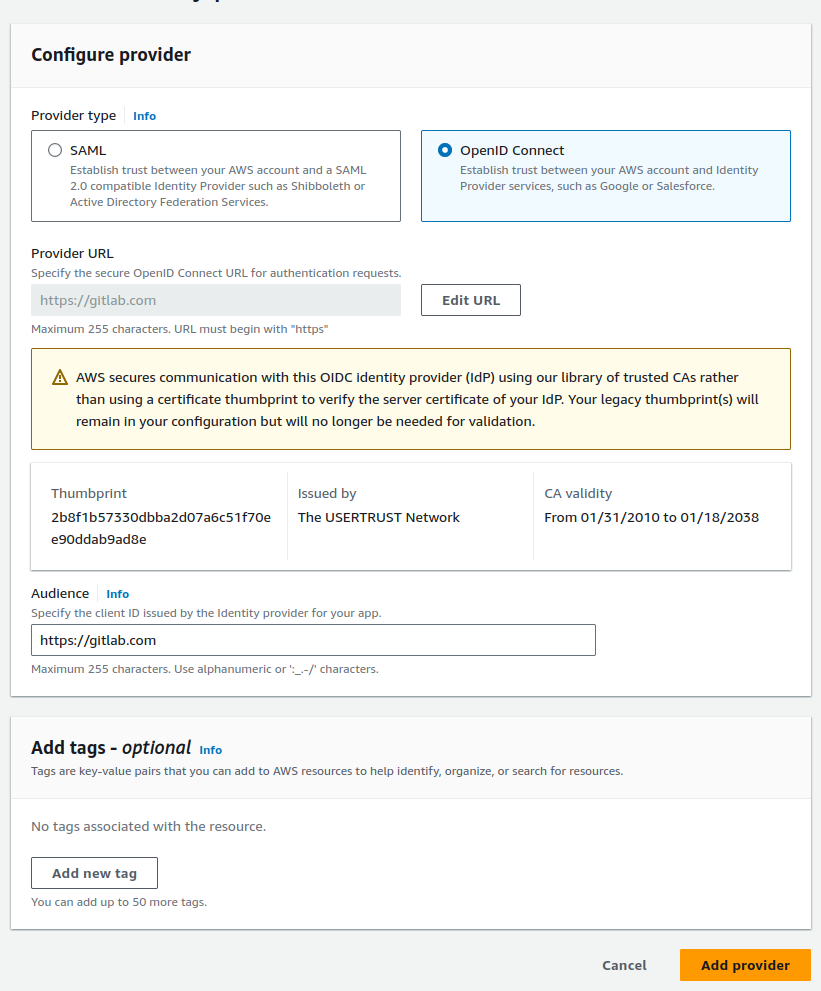 See more details at AWS Creating and managing an OIDC provider.
Create a role
- Go to the IAM dashboard by searching
IAMin the searchbar - Click on the
Rolessection in the left sidebar under Access management - Click on the
Create rolebutton in the right top right corner - Complete the following information
Trusted entity type:
Web identityIdentity provider:gitlab.comAudience:https://gitlab.com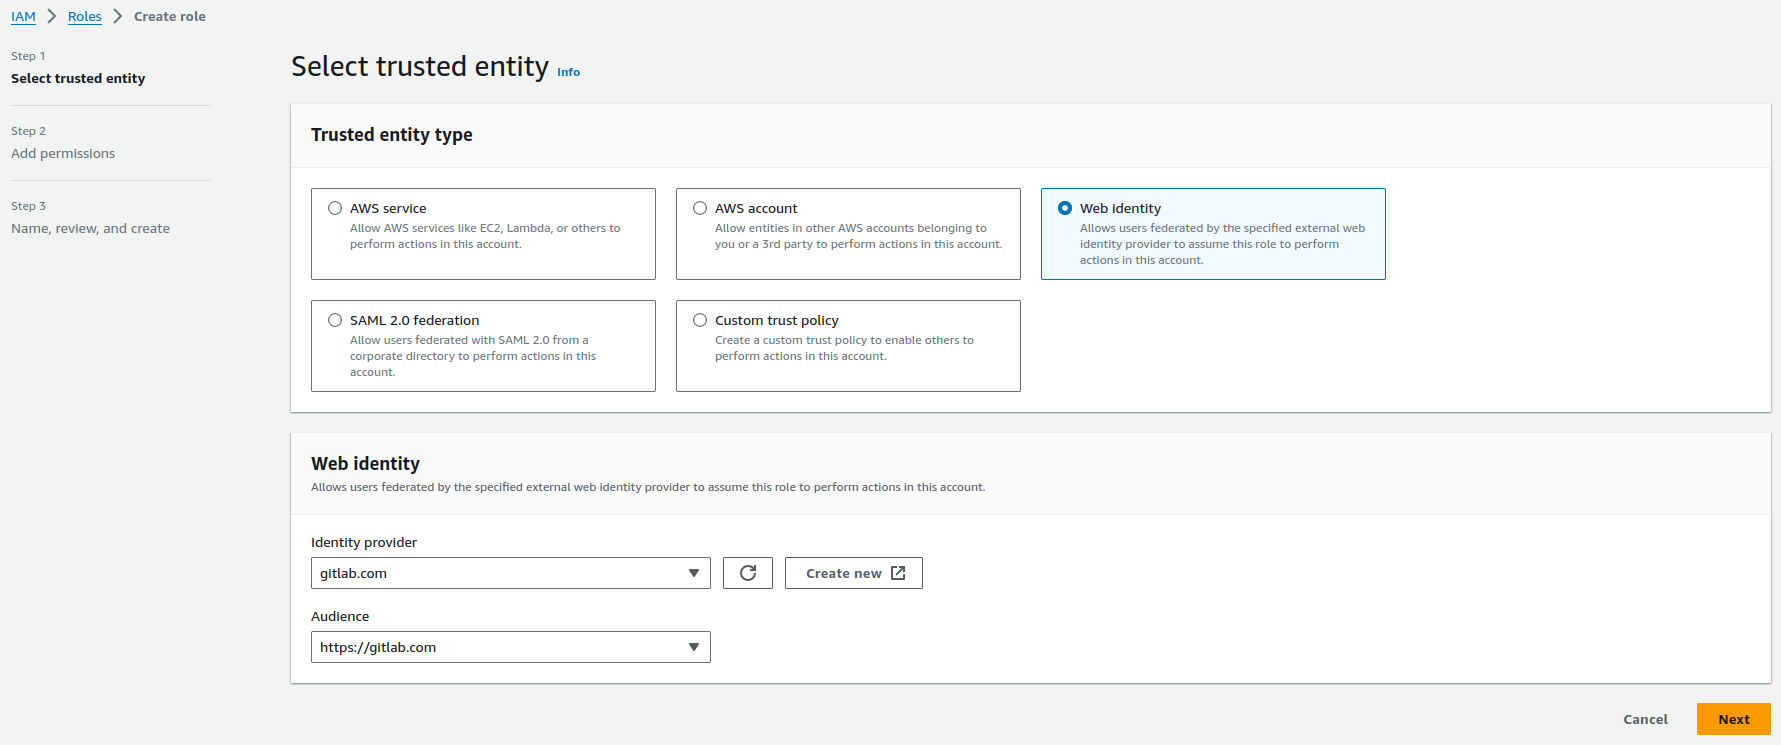 Find more details at Gitlab Configure a role and trust
 -
Add the following permissions to the role:
- EC2 Auto Scaling:
AutoScalingFullAccess - EC2:
AmazonEC2FullAccess - Identity and Access Management:
IAMFullAccess - Elastic File System:
AmazonElasticFileSystemFullAccess
- EC2 Auto Scaling:
-
Give the role a name, something like
gitlab-oidc - Check that the trust relationship looks like this:
- Click on create role in the bottom right corner
- Navigate to the role you just created by searching its name in the roles search bar
- Take note of the role Amazon Resource Names (ARN) which should look like
this
arn:aws:iam::<YOUR_AWS_ACCOUNT>:role/<ROLE_NAME>
Fork
Fork the terraform-yocto-gitlab project so that you can configure the infrastructure before the deployment.
Gitlab runner register
- From your Gitlab project, navigate to Settings --> CI/CD --> Runners.
- Then click on
New project runner -
Complete the following options:
- Platform - Operating systems:
Linux - Tags:
has:shared-folder, infrastructure:aws, usage:yocto
- Platform - Operating systems:
-
Leave the configuration section empty
- Create the runner
- Write down the authentication token and ignore other Gitlab indications
Gitlab CI variables
- Go to Settings --> CI/CD --> Variables
- Click on
Add variableand complete the following:- Type:
Variable - Environments:
All - Flags:
Protect,Mask,Expand - Key:
ROLE_ARN - Value: the arn of the AWS role that you just created
- Type:
- Add another variable with the following configuration:
- Type:
Variable - Environments:
All - Flags:
Protect,Mask,Expand - Key:
GITLAB_RUNNER_TOKEN - Value: the authentication token you received when creating the runner
- Type:
Runner module access
You shouldn't have to fork the
runner module project,
but if you did, follow the instruction below.
Grant access to the runner module by going to this project's Settings --> CI/CD --> Token access
and adding the url of you forked terraform-yocto-gitlab in the Project with access list.
Deploying
If needed, edit the terraform configuration to customize the infrastructure, for this see this section. Then commit these changes and this will trigger a pipeline to run. Go to the pipelines view in Gitlab, when the prepare and validate steps are done, you can manually run the packer:build job which will create the AMIs on AWS. And when this is completed you can run the terraform:apply job in order to deploy the infrastructure. Then you are ready to Build with the infrastructure
Manual deployment
Automated deployment is preferred but you might want to do some testing by deploying from your machine. Here are some details on how to setup your dev environment.
AWS access key
From your AWS account, go to Security credentials --> AWS IAM credentials --> Access key. Then create a key that you will need for the AWS CLI configuration in the next step.
Tools installation
We have to install the following tools : AWS CLI, Packer, Terraform. If you already have them installed and configured you can skip this and jump to Deploy the infrastructure.
AWS CLI Install AWS CLI from here.
Configure the tool by creating or editing the file ~/.aws/config
The region will be used by Packer to create AMIs.
Place the access key that you created previously in the file ~/.aws/credentials
Packer Install Packer from Hashicorp Install Packer page
Terraform Install Terraform from Hashicorp Install Terraform page
Deploy the infrastructure
- Clone the infrastructure project
-
Build the instance images with Packer
This is going to create two AMIs that you can find in your AWS EC2 dashboard. -
Deploy the infrastructure with Terraform
Enter the Gitlab runner token when asked for it. Then confirm withyes.
This is going to create all the ressources and start the gitlab runner instance.
Build with the infrastructure
Now you should see that your runner is registered if you go back to your Gitlab CI/CD settings. Then you can fork the Welma CI project, add the runner to this project from the CI/CD settings, and then trigger a CI pipeline run.
Customization
There are several parameters you can change so that the infrastructure match your needs. Here are some of them.
Region
There are a lot of things to consider when choosing the region to deploy your infrastructure such as cost, latency and features availability.
It can be a good way to save money depending on your requirements.
The default region for this project is us-east-2.
It can be edited with the aws_region variable in /instances/variables.tf.
Build instance type
The build instance type choice will have an impact on build duration and cost.
The default type for this project is c6i.2xlarge.
It can be edited with the build_instance_type variable in /instances/variables.tf.
We recommend using machines from the compute optimized family for better CPU performance.
After testing several of them we selected c6i.2xlarge because of the good price / performance ratio.
Another one we can recommend is c6i.4xlarge. The builds are going to be faster but a bit more expensive.
We would recommend this one if you build from zero really often and you want to save time, the difference will be smaller for incremental builds.
The table below shows some statistics we gathered from our testing (Yocto build).
| Build type | Instance type | Build duration (minutes) | Instance hourly cost ($) | EBS size (GB) | Total cost ($) |
|---|---|---|---|---|---|
| Initial | m5zn.xlarge | 557 | 0.3303 | 100 | 3.17 |
| Initial | c6i.2xlarge | 221 | 0.34 | 100 | 1.29 |
| Initial | c6i.4xlarge | 160 | 0.68 | 100 | 1.84 |
| Incremental | c6i.2xlarge | 30 | 0.34 | 100 | 0.18 |
| Incremental | c6i.4xlarge | 24 | 0.68 | 100 | 0.28 |
As you can see, using a general purpose instance such as m5zn.xlarge is not a good choice for our purpose.
And choosing between c6i.2xlarge and c6i.4xlarge will depend on if you are more interested in lower cost or faster builds.
Build instance storage size
The size of the storage will have an impact on the build cost.
It might be worth doing some tests to find the smallest size that works for your project.
It can be edited with the build_instance_ebs_size variable in /instances/variables.tf.