MSC SM2S IMX8PLUS
Board Identification
Identifiers: Mother board SM2S-MB-EP5-002 + SOM, either of:
- SM2S-IMX8PLUS-QC-14N0740I
- SM2S-IMX8PLUS-QC-24N0600I
Yocto MACHINE: sm2s-imx8plus-mbep5
Documentation:
- SOM: MSC SM2S-IMX8PLUS User Manual, 17.01.2023, Rev. 0.14
- Mother Board: MSC SM2S-MB-EP5 Revision DV3 User Manual, 2022-MAR-17, Version 0.12
Features:
SM2S-IMX8PLUS-QC-14N0740I:
- SoC: i.MX 8M PLUS, quad core ARM Cortex-A53 64-bit + ARM Cortex M7
- RAM: 2GB SDRAM
- Storage: 16GB eMMC + microSD
- 2x RJ45 Ethernet
- Wifi
- Bluetooth
- 4 USB ports
- Video & sound:
- HDMI
- FFC connector for CSI camera
- Connector for line out and microphone
- JILI30 connector with dual channel LVDS
- PCIe Mini Card slot
- SATA, SPI, I2C, UART, CAN, GPIO
SM2S-IMX8PLUS-QC-24N0600I has the same features, except for these:
- RAM: 4GB SDRAM
- No Wifi
- No Bluetooth
- Video & sound:
- JILI30 connector with two single channel LVDS
Boot Sequence
- The ROM code loads imx-boot from eMMC at offset 32 KiB.
- The following components of imx-boot get executed:
- U-Boot SPL
- tee.bin
- lpddr4_pmu_*.bin
- ...
- U-Boot
- U-Boot starts the kernel
- The kernel mounts the initial ram file system (initramfs) and starts Init
First Installation
The first installation on eMMC is done via the SD card.
-
On your PC:
- Copy
imx-boot-devto the SD card at offset 32 KiB - Copy the
.wic.gzfile to the TFTP server directory
- Copy
-
On the board:
- Insert the SD card
-
Set the boot switches to boot from SD card:
4. TEST# = ON -
Power on the board and stop in U-Boot
-
In U-Boot, download the
.wic.gzby TFTP. Example:u-boot=> setenv ipaddr 169.254.142.1 u-boot=> setenv serverip 169.254.142.224 u-boot=> tftp welma/welma-image-minimal-dev-sm2s-imx8plus-mbep5.wic.gz Using ethernet@30be0000 device TFTP from server 169.254.142.224; our IP address is 169.254.142.1 Filename 'welma/welma-image-minimal-dev-sm2s-imx8plus-mbep5.wic.gz'. Load address: 0x40480000 Loading: ################################################################# ################################################################# ... ## 4.5 MiB/s done Bytes transferred = 144100567 (896ccd7 hex) -
In U-Boot, flash to eMMC:
-
In U-Boot, set BOOT_PARTITION_ENABLE to zero:
Issue when booting from eMMC
The eMMC provides external access to the memory thanks to hardware partitions. Those partitions are different from the partitions MBR or GPT used in partition tables. Indeed, it is possible to have partitions MBR or GPT into hardware partitions. The eMMC is generally composed of four hardware partitions:
- two boot partitions used when the bootloader is started,
- a RPMB (Replay Protected Memory Block) storing some data in a protected space,
- and a User Data Area partition which is mostly used at runtime.
Welma is working only on the User Data Area hardware partition.
If BOOT_PARTITION_ENABLE was 1 (which may happen on new boards, depending on manufacturing settings) the bootloader would be searched on one of the hardware boot partitions and the board would not boot (because Welma locates it in the User Data Area partition).
This problem can be detected using the following command (U-Boot on SD card):
u-boot=> mmc partconf 2
EXT_CSD[179], PARTITION_CONFIG:
BOOT_ACK: 0x0
BOOT_PARTITION_ENABLE: 0x1
PARTITION_ACCESS: 0x0
Here, BOOT_PARTITION_ENABLE is 0x1, which means that the bootloader is searched in a boot partition. To disable this, it is possible to use the following command:
To check if the problem is solved, the previous command can be used:
u-boot=> mmc partconf 2
EXT_CSD[179], PARTITION_CONFIG:
BOOT_ACK: 0x0
BOOT_PARTITION_ENABLE: 0x0
PARTITION_ACCESS: 0x0
The BOOT_PARTITION_ENABLE is 0x0 now, meaning that the bootloader will not be searched in one of the boot partition but in the User Data Partition.
Regular Boot
The regular boot is done from eMMC, as follows:
- Set the boot switch to boot from eMMC:
4. TEST# = OFF - Start the board.
Appendix
Boot from SD card
Set the boot switch of the mother board:
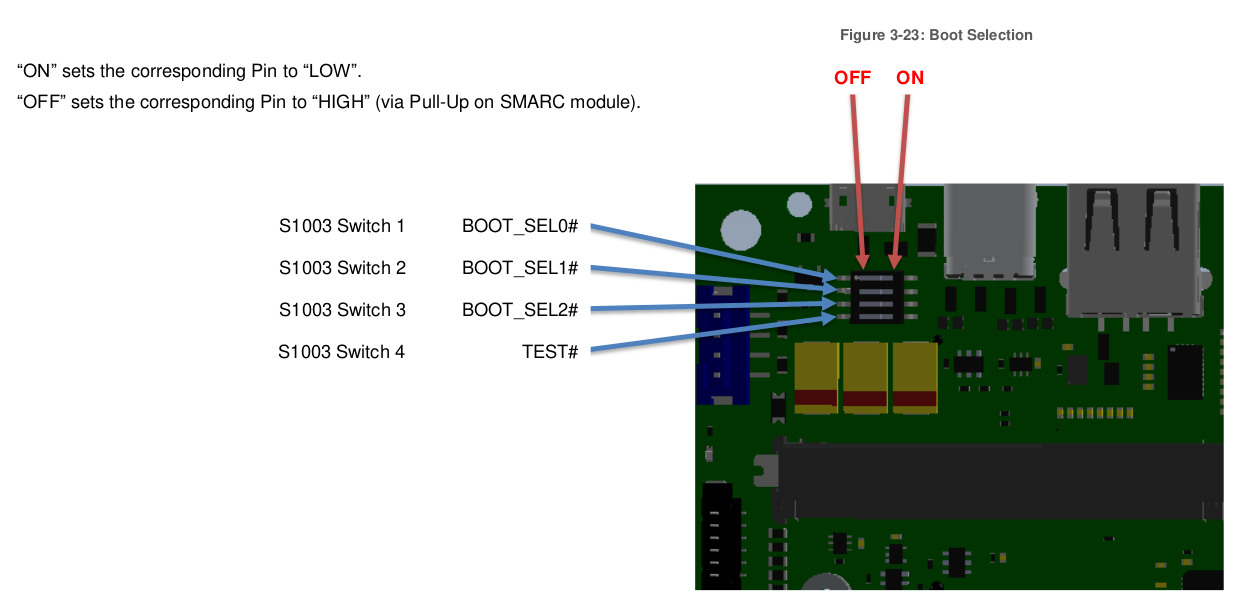
The boot switches BOOT_SEL0#, BOOT_SEL1#, BOOT_SEL2#, are used in the original boot sequence designed by MSC (see below).
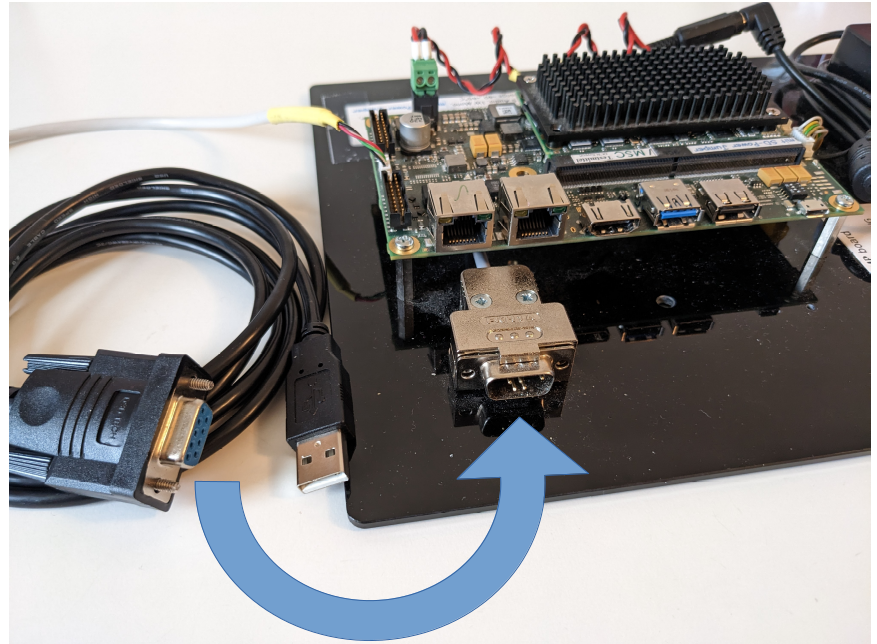
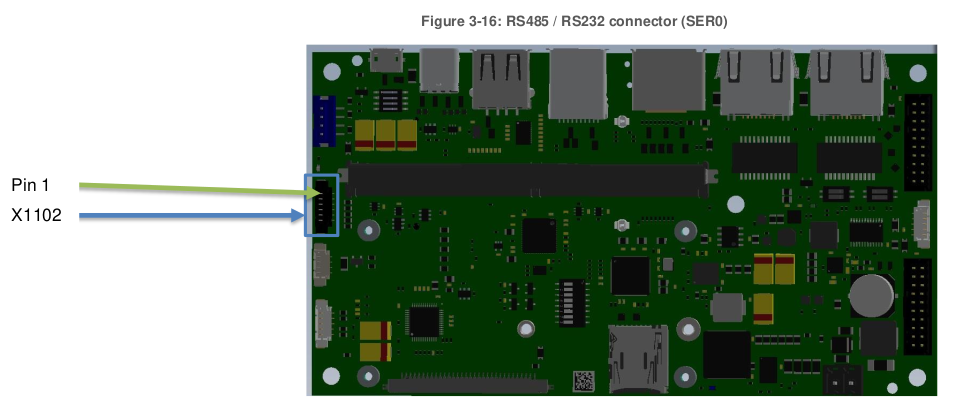
Connect to the debug serial port
Connect your PC to the SER0 RS232 interface on connector X1102 (compatible 1.8 V). Bit rate: 115200 baud.
Flash imx-boot on SD card from PC
Example for flashing imx-boot-dev image on SD card:
Start imx-boot on eMMC with uuu
This procedure shows how to upload an imx-boot image onto the board (in RAM)
and have it executed, so that it can be later used for fuse or eMMC
provisioning. This is an alternative to using an SD card.
Ref: Avnet Embedded, Using NXP Mfgtools / "uuu" with MSC Boards - Application Note #035 (App_Note_035_Using_NXP_Mfgtool+uuu.pdf)
-
Connect the micro USB connector X0803 of the board to you host PC.
-
Pull the
FORCE_RECOV#line to LOW (some carrier boards have this done permanently at the factory). -
Set the boot switch of the mother board:
4. TEST# = ON -
Power on the board
-
Execute UUU
uuu can generally be installed as a package of your Linux distribution.
$ sudo uuu tmp/deploy/images/sm2s-imx8plus-mbep5/imx-boot

uuu (Universal Update Utility) for nxp imx chips -- lib1.4.193
Success 1    Failure 0
3:113    1/ 2 [=================100%=================] SDPS: boot -f "tmp/deploy/images/sm2s-imx8plus-mbep5/imx-boot"
3:113    2/ 2 [Done                                  ] SDPS: done
And on /dev/ttyUSB0, imx-boot can be seen starting.
------------------------------
company .......... msc
form factor ...... sm2s
platform ......... imx8mp
processor ........ imx8mp
feature .......... 24N0600I
serial ........... 1016985128
revision (MES) ... B0
boot count ....... 928
------------------------------
...
Hit any key to stop autoboot:  0
u-boot=>
Flash imx-boot on eMMC from a running U-Boot
u-boot=> setenv ipaddr 169.254.142.1
u-boot=> setenv serverip 169.254.142.224
u-boot=> ping $serverip
u-boot=> tftp imx-boot
# Assuming block size is 512 (0x200)
u-boot=> setexpr nblocks $filesize / 200
u-boot=> setexpr nblocks $nblocks + 1
# mmc dev: 1=sd 2=emmc
u-boot=> mmc dev 2
u-boot=> mmc write ${loadaddr} 40 $nblocks
MMC write: dev # 1, block # 64, count 2512 ... 2512 blocks written: OK
Hardware Watchdog
The SOM has 2 hardware watchdogs:
- 1 in the IMX8 SoC
- 1 with the RN5T618 power management system device
/sys/class/watchdog/watchdog0 -> ../../devices/platform/soc@0/30000000.bus/30280000.watchdog/watchdog/watchdog0
/sys/class/watchdog/watchdog1 -> ../../devices/platform/soc@0/30800000.bus/30ae0000.i2c/i2c-5/5-0030/rn5t618-wdt/watchdog/watchdog1
Welma uses the first one (inside the SoC).
- Started by U-Boot (timeout 60 s)
- Serviced by the Linux kernel (as long as no userspace process opens
/dev/watchdog0and takes over) - Then serviced by systemd
GPU drivers
NXP does no longer support EGLFS in their libEGL (imx-gpu-viv-6.4.11): https://www.nxp.com/lgfiles/NMG/MAD/YOCTO/imx-gpu-viv-6.4.11.p2.8-aarch64-95408a4.bin