STM32MP157F-DK2
Board Identification
Identifier: STM32MP157F-DK2
Yocto MACHINE: stm32mp15-disco-welma
Documentation:
- UM2637 - Rev 4 - January 2023 - User manual
- https://www.st.com/en/product/stm32mp157f-dk2.html
Features:
- MPU: STM32MP157f dual ARM Cortex‑A7 32-bit + ARM Cortex‑M4 32-bit
- GPU
- RAM: 512 MB DDR3L
- Storage: microSD
- RJ45 Ethernet
- Wi‑Fi
- Bluetooth
- 4 USB Host Type-A
- USB Type-C
- Video & sound:
- MIPI DSI
- HDMI
- Stereo headset jack including analog microphone input
- 4" TFT 480×800 pixels with LED backlight, capacitive touch panel
- 4 user LEDs, 2 user and reset push-buttons, 1 wake-up button
Boot Sequence
The boot sequence is from a SD card, as follows:
-
The ROM Code (BL1) loads TF-A (BL2, FSBL) from the first GPT partition (raw) into SRAM (System RAM inside MPU), and starts it.
-
TF-A:
- Initializes DRAM (used in the following steps)
- Loads the FIP container (SSBL) from the partition named "fip"
- Launches OP-TEE (BL32)
-
OP-TEE launches U-Boot (BL33) (in DRAM)
- U-Boot starts the kernel
- The kernel mounts the initial ram file system (initramfs) and starts Init
Reference: https://trustedfirmware-a.readthedocs.io/en/latest/design/firmware-design.html
Glossary:
- FSBL: First Stage Boot Loader
- SSBL: Second Stage Boot Loader
- DRAM: Dynamic RAM, external to the MPU
- TF-A: Trusted Firmware-A
Notes
-
The ROM code supports loading TF-A from the first or the second GPT partition. But by default on Welma, only the first partition contains TF-A.
-
TF-A Firmware update is not supported in Welma.
First Installation
There are two options for installing software on the board:
- Flashing the SD card on a PC, as explained in the quick start.
- Using DFU mode and TFTP, as explained in this section.
First Step: Get U-Boot running in RAM
-
Switch the boot mode pins, to make the ROM Code start in mode DFU over USB:
- BOOT0 OFF
- BOOT2 OFF
-
Connect your cables between the board and the PC:
- Serial port ST-LINK (not actually needed in this step, but gives useful information)
- USB OTG
-
Power on the board
-
Have the board load and execute TF-A / OP-TEE / U-Boot in RAM:
Second Step: Install Welma on the SD Card
This step can be executed after the first step or when booting a previously installed SD card.
-
Connect your cables between the board and the PC:
- Serial port ST-LINK
- Ethernet
- You no longer need USB OTG
-
Insert a SD card to be programmed into the microSD slot of the board
-
Take control of U-Boot, download the SD card image via TFTP and write is to its destination:
-
Power down the board
Regular Boot
The regular boot is done from SD card, as follows:
-
Switch the boot mode pins, to make the ROM Code start on the SD card:
- BOOT0 ON
- BOOT2 ON
-
Power on the board
Appendix
Connecting the board
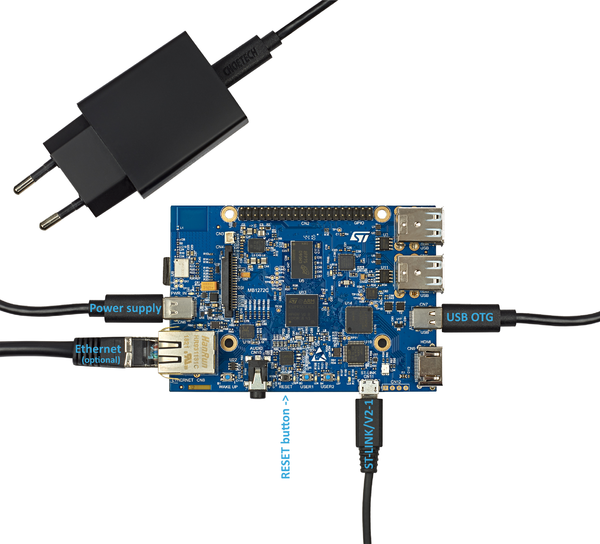
To connect to the console, connect your PC to the ST-LINK/V2-1
(micro-USB, /dev/ttyACM0, 115200 baud).
Boot mode switches
Two switches at the back of the board enable chosing the boot mode.
-
Boot in DFU (Device Firmware Update) mode:
- BOOT0 OFF
- BOOT2 OFF
-
Boot from the SD card:
- BOOT0 ON
- BOOT2 ON
Hardware Watchdog
The board has 1 hardware watchdog inside the MPU.
- Started by U-Boot (timeout 32 s)
- Serviced by the Linux kernel (as long as no userspace process opens
/dev/watchdog0and takes over) - Then serviced by systemd