Qt
This guide aims to assist you in developing application using Qt 5 or 6 on Welma.
It is assumed that Qt Creator is already installed and ready for use.
The objective is to configure the Qt Creator IDE to compile, execute and debug your application for your target machine.
This guide is based on Qt Creator version 12.0.1 and has been tested using a raspberry pi 4B and an stm32mp15.
Build the SDK
The initial requirement is the Software Development Kit (SDK) containing all necessary libraries, cross-compilers, and binaries for the target.
Here is an example of how to build the SDK for a Raspberry Pi 4 with Qt6:
$ export MACHINE=raspberrypi4-64-welma
$ export QT_PROJECT=meta-demo-qt6-wayland

$ source meta-welma/setup/setup-build-env meta-demo-graphics/$QT_PROJECT/conf/templates/$MACHINE/
$ bitbake meta-toolchain-qt6
If your projects is based on Qt5, ensure to use the meta-toolchain-qt5 recipe.
Your target should also be using a meta-demo-graphics using Qt5.
Upon completion of compilation, you should find the following files (names may
vary depending on the sources Qt project) in your build/tmp/deploy/sdk folder:
welma-wayland-glibc-x86_64-meta-toolchain-qt6-cortexa72-raspberrypi4-64-welma-toolchain-0.9.1.host.manifest
welma-wayland-glibc-x86_64-meta-toolchain-qt6-cortexa72-raspberrypi4-64-welma-toolchain-0.9.1.sh
welma-wayland-glibc-x86_64-meta-toolchain-qt6-cortexa72-raspberrypi4-64-welma-toolchain-0.9.1.target.manifest
Install and Use the SDK
Installing the SDK is straightforward.
Execute the .sh file, and choose the installation path, which default to : /opt/WELMA_DISTRO/VERSION.
For consistency throughout this guide, we'll refer to the SDK installation path as $SDK_PATH.
To utilize the SDK, it's crucial to source the environment file before launching Qt Creator from the same terminal.
You can start Qt Creator with the command: qtcreator,
or if that first option is not available,
by manually starting qtcreator.sh in Qt Creator install directory (referred to as $QT_INSTALL_PATH):
$ source $SDK_PATH/environment-setup-cortexa7t2hf-neon-vfpv4-poky-linux-gnueabi
$ $QT_INSTALL_PATH/Qt/Tools/QtCreator/bin/qtcreator.sh
Ensure everything proceeded smoothly by running $ echo $OECORE_TARGET_SYSROOT
and verifying it points to your SDK install path.
Configure Device
Before configuring the device via Qt Creator, ensure your target is running the
meta-demo-graphics image and is connected to your workstation via an Ethernet cable.
Navigate to Edit > Preferences and select the Devices menu.
From there, add a Remote Linux Device with the following properties:
- Name of your choice
- IP address: fe80::1%eno2 (replace
eno2with the corresponding Ethernet network interface) - SSH port number: 22
- login username: root

The Test button verifies proper device configuration.
There may be errors regarding sftp or rsync but as long as "Device test
finished successfully." is displayed, the device is ready to use.
Configure Kit
In Qt Creator, kits describe the building and running environment of a project.
To create a new kit, go in Edit > Preferences and select Kits.
From there, you can Add a kit and specify the following information.
Note that Qt Creator expands environment variables. This feature is used to make the following paths project-agnostic.
- Name of your choice
- Run device type :
Remote Linux Device - Device : previously configured device
- Build device :
Desktop - C Compiler path:
$OECORE_TARGET_ARCH-poky-$OECORE_TARGET_OS-gcc - C++ Compiler path:
$OECORE_TARGET_ARCH-poky-$OECORE_TARGET_OS-g++ - Debugger path:
$GDB - Sysroot:
$SDKTARGETSYSROOT - Qt version path:
$OECORE_NATIVE_SYSROOT/usr/bin/qmake - CMake Tool: specifying
cmakeshould be enough, if not, the full path is$OECORE_NATIVE_SYSROOT/usr/bin/cmake
Qt Creator automatically detects compilers, debuggers, qt versions and CMake. If the correct versions are not listed, manually add them in the corresponding menus.

Compile and Execute a Simple Qt Project
To test cross-compilation, create a default Qt Widgets Application.
Both CMake and QMake are expected to work, so choose as per your preference.
Also make sure to select your kit (you can still add it later in the Projects menu).
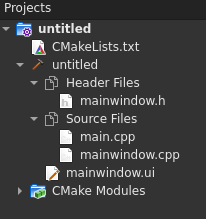
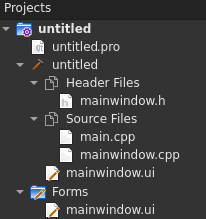
This default project, generate this file tree for CMake and QMake:
Project compilation should succeed, however, additional configuration is required to run the application on the target.
If you encountered some errors about broken CXX compiler not being able to compile a simple test program, follow this procedure:
- Go to
Projects > Your Kit > Build - In CMake section, make sure
Detailsis expanded - Unset
CMAKE_CXX_COMPILERinInitial Configurationtab (cf. image below) - Go back to
Editmode Build > Clear CMake ConfigurationBuild > Run CMake

If you attempted to run the program from Qt Creator Build > Run, you might
have encountered the following error message :
Path "device://{...}/usr/bin" exists but is not a writable directory.
Welma's configuration includes some read-only partitions causing the is not a writable directory error.
Applications in Welma are usually stored in the /app directory.
However, this location is read-only by default.
To deploy your application in this location,
you need to remount the directory in read-write with: mount -o remount,rw /app.
A simpler way to deploy and execute your application is to deploy it to the /home directory,
which is read-write by default, making development easier.
Keep in mind that you'll probably want to release your application in /app,
and that your application might not have the exact same behavior between those two locations.
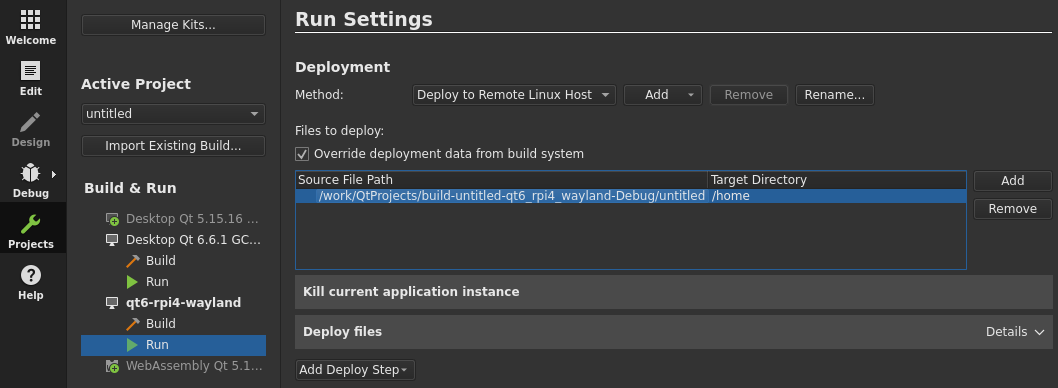
To do so, override override deployment data from build system, in the Projects and build menu of your Kit.
Set the Source File Path to the cross-compiled application.
This file is located in a directory named build-PROJECT_NAME-KIT_NAME-BUILD_TYPE
at the same level of your project installation.
Example : /QT_PROJECT_PATH/build-MY_PROJECT-RPI4_QT6-Debug/MY_PROJECT
Set the Target Directory to /home
Make sure Qt Creator takes this change into account by clicking on Build > Rescan Project.
For Welma distribution using Wayland, certain variables are needed to run the application.
In the Projects and Run menu, add the following environment variables:
WAYLAND_DISPLAY=wayland-0XDG_RUNTIME_DIR=/run
For Qt5 application, include -platform wayland in the command line arguments section.
Now, deployment should work smoothly.
Press the Build > Run button, the application should compile, deploy and start,
displaying a white empty screen on the target display.
Remote Debug
To debug your application using Qt, your target must run a debug image of Welma which includes gdbserver.
Before starting gdbserver, you need to manually set the environment variables
on the target using the export command:
export WAYLAND_DISPLAY=wayland-0 && export XDG_RUNTIME_DIR=/run.
To run gdbserver using ethernet connection between the target and your workstation,
execute: gdbserver fe80::1%eth0:1234 /home/YOUR_APPLICATION
Once again, replace eth0 with the corresponding Ethernet network interface of your target,
and do the same for the executable name.
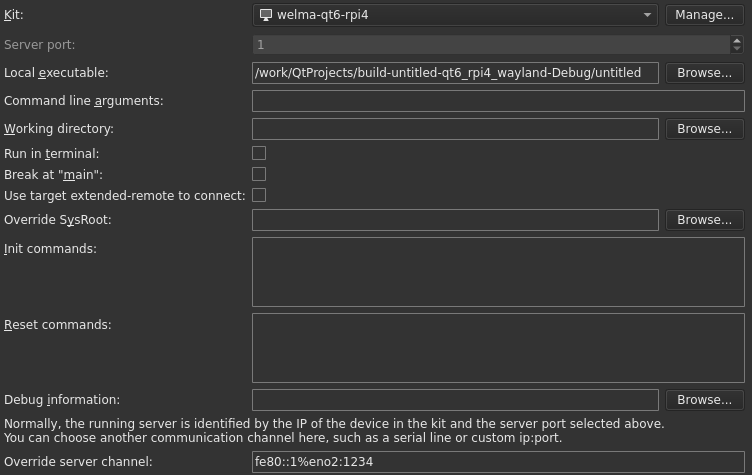
From Qt Creator, go in Debug > Start Debugging > Attach To Running Debug Server
- Select your kit
- Set your local executable location (this path is the same than the
Source File Pathof the previous section) - Override the server channel with:
fe80::1%eno2:1234. The port should be the same as used by gdbserver
From there you should see debugging windows showing the stack state, set breakpoints, and many other debugging features allowing you to efficiently debug your application.