Embedded Software Update
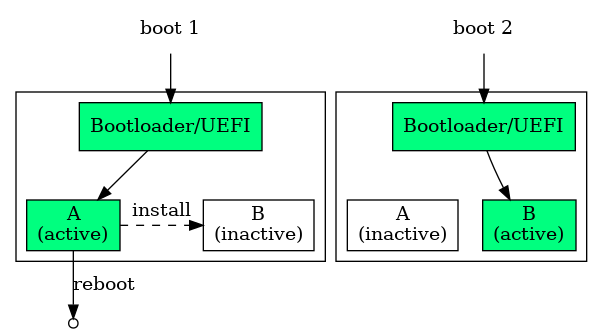
Welma integrates a reliable solution for remote software update after the device has been brought into operation. The mechanism is based on a A/B scheme:
- The device stores two copies of the software system: A and B
- At a given moment the device is running either A or B. This is the active system. The other system is said "inactive".
- The procedure of software update is:
- transfer new software to the device
- install new software on the inactive system
- reboot and have the inactive system become active
Boot sequence in a A/B install process:
Yocto Build
In order to activate the software update feature, you need:
- In your image:
- In your
local.conf, select the underlying mechanism:WELMA_UPDATE = "swupdate"(this is the default)- or
WELMA_UPDATE = "mender" - or
WELMA_UPDATE = "mender-connected"
The generated output files will be:
- A SD card image with the whole partitioning (with extensions
.wicor.wic.gz) suitable for the first bare-metal installation of the device. - Module files (with extensions
.swuor.mender) for remote updates.
Secure Update
Optionally, it is possible to have SW modules authenticated before they are installed. The authentication is done by verifying a cryptographic signature.
For this mechanism to work, 3 things are needed:
- Embedded software must be provisionned with a public key used for the verification of the signature.
- The module to be installed (boot, sysro, appro) must have the appropriate signature.
These 3 things can be achieved with the following Yocto parameters:
WELMA_SECURE_UPDATE = "1"inlocal.conf(this is the default value)WELMA_KEY_SWK1_PUB/PRIVorWELMA_KEY_SWK2_PUB/PRIV: defines SWK1 or SWK2. Either one of them can be used. If both are defined, only SWK2 is used.
Updating Software at Runtime
To deploy a new software version on your device:
-
Have your embedded application retrieve the modules to be installed (via network, USB, etc.).
-
Have your application request the system to make the installation, via the command
updatectl installor via the D-Bus API (see below). -
Have your application reboot the device
-
After reboot, the device should be running the new version. Have your application check that the device is operational and confirm the update via the
updatectl confirmAPI or via the D-Bus API (see below).
Notes
BOOT, SYSRO and APPRO modules can be installed together or separately.
When things go wrong:
-
If the application does not confirm the installation, then:
- other software updates will be rejected;
- at next reboot the device will rollback to the initial system;
- after 2 minutes a watchdog will force rebooting.
-
If the installation is interrupted (eg: by a power outage), then the initial state remains unchanged and the device remains operational.
-
If the new version installed has defects and does not boot, the HW watchdog will make the device reboot and come back to the initial state.
-
If the application does not confirm within the allocated time, then the device reboots, and comes back to the initial state.
updatectl API
Usage: updatectl install FILE [FILE ...]
       updatectl confirm
       updatectl abort
       updatectl status [PROPERTY]
       updatectl clearance-request REASON
       updatectl clearance-notify RESPONSE

Commands:

  confirm   Confirm a software update under test
  install   Install a software update and schedule it for next reboot as under test
  abort     Abort a pending software update (scheduled or under test)
  status    Print update status
  clearance-notify
            Send the clearance response.
  clearance-request
            Send a request for clearance.

Arguments:

  FILE      A software module to be installed.
  PROPERTY  A single property for which the status is needed
  REASON    download | install
  RESPONSE  ready | rejected | retry-later
Example of a manual installation scenario:
# updatectl status
state               normal
partitions-active   /dev/mmcblk2p1 /dev/mmcblk2p3 /dev/mmcblk2p5
partitions-inactive /dev/mmcblk2p2 /dev/mmcblk2p4 /dev/mmcblk2p6

# updatectl install /tmp/appro-v1.1.swu

# reboot
...

# updatectl status
state               under-test
partitions-active   /dev/mmcblk2p1 /dev/mmcblk2p3 /dev/mmcblk2p6
partitions-inactive /dev/mmcblk2p2 /dev/mmcblk2p4 /dev/mmcblk2p5

# updatectl confirm
Update Daemon D-Bus API
node /com/witekio/update1 {
  interface com.witekio.update1.Manager {
    methods:
      AbortUpdate();
      BeginUpdate();
      ConfirmUpdate();
      InstallLocalFile(in s file_path);
      MarkSlotUpdated(in s slot_name);
      SubmitUpdate();
      RequestClearance(in s reason, out s response);
      NotifyClearance(in s status);

    signals:
      ClearanceRequested(in s reason);

    properties:
      readonly s State;
  }
}
BeginUpdate() starts an update transaction, that shall be followed by:
- Installing modules, via
InstallLocalFile() - Submitting the update to the bootloader, via
SubmitUpdate() - Rebooting
- Confirming the update, via
ConfirmUpdate()
AbortUpdate() aborts a started update transaction, before or after reboot.
Aborting an update after reboot leads to reboot and a rollback to the
initial software system.
InstallLocalFile() installs a module onto its inactive partition. Cannot be
used in mode mender-connected (see MarkSlotUpdated()).
MarkSlotUpdated() marks a slot (partition) as updated, when the installation
was not made using InstallLocalFile(). This is typically used in mode
mender-connected. slot_name must be either of: boot, sysro, appro.
SubmitUpdate() submits the update to bootflags, that tells the bootloader
to do next boot on the newly installed partitions.
ConfirmUpdate() makes the update persistent. Rollback cannot be performed
after this.
RequestClearance() requests that the embedded system prepares itself for a
significant update operation such as downloading or installing modules.
It is typically called by a program in charge of downloading and installing
modules when another program (application, GUI,...) is in charge of granting
clearance (by calling NotifyClearance()).
reasonmust be one of:download,install.responseis the status given byNotifyClearance(), ortimeoutif no response is received after 5 minutes.
Only one clearance request is allowed at a time.
NotifyClearance() informs the update subsystem about the status of the
clearance request. status must be one of: ready, rejected, retry-later.
It is given as a response to RequestClearance().
ClearanceRequested() is sent out each time a clearance request is done.
reason is the reason given in the clearance request.
State contains the state of the update daemon, one of:
normal: Regular operational state, a new update procedure may be initiated byBeginUpdate().normal,ongoing-install: A module is being installed byInstallLocalFile(). Other installation or submit requests will be rejected.normal,aborting: An installation procedure is being aborted byAbortUpdate(). Other requests will be rejected.normal,test-scheduled: An update procedure has been submitted bySubmitUpdate()and awaits a reboot for taking effect.under-test: The system is running on modules that just got installed before the latest reboot, and the update daemon is waiting for a call toConfirmUpdate().
How to Determine if the Device is Operational
This paragraph is only advisory.
Before validating that a new installed software version is operational a few project-specific verifications shall be performed by the application.
The purpose is to prevent:
- The device from being locked out of remote control.
- Retrieving physically the device and recommissioning.
Example of what could be verified:
- Network is reachable (this can verify network parameters, URL, TLS certificates,...).
- Data stores in SYSRW are correctly loaded (this can verify incompatible files formats, databases).
Using Production Keys (Secure Update)
The key used for secure update can be changed (without being in the Yocto
build), with tools of welma-signing-tools.
Inject SWK1 in the bootloader
See page Secure Boot on IMX with HABv4 or Secure Boot on STM32MP25x
Inject SWK2 in the kernel FIT image
- Extract
fitImagefrom the BOOT module (eg: usingmcopy) - Inject the certificate into the ramdisk at path
/etc/swk/swk2.crt - Rebuild the BOOT module with the updated
fitImage(eg: usingmcopy)
Inject SWK2 in the UEFI Comboapp
The comboapp is located in the BOOT module with .efi suffix (eg: bootx86.efi).
- Extract the comboapp from the BOOT module
- Inject the certificate into the ramdisk at path
/etc/swk/swk2.crt
welma-signing-tools/common/inject-cert-comboapp-ramdisk \
    bootx86.efi \
    CERTIFICATE \
    /etc/swk/swk2.crt
bootx86.efi
Sign
-
When using mechanism
swupdate: -
When using mechanism
menderormender-connected, use mender-artifact
Internal Architecture
This paragraph describes how things are internally organized.
This is how the system handles A/B partitions:
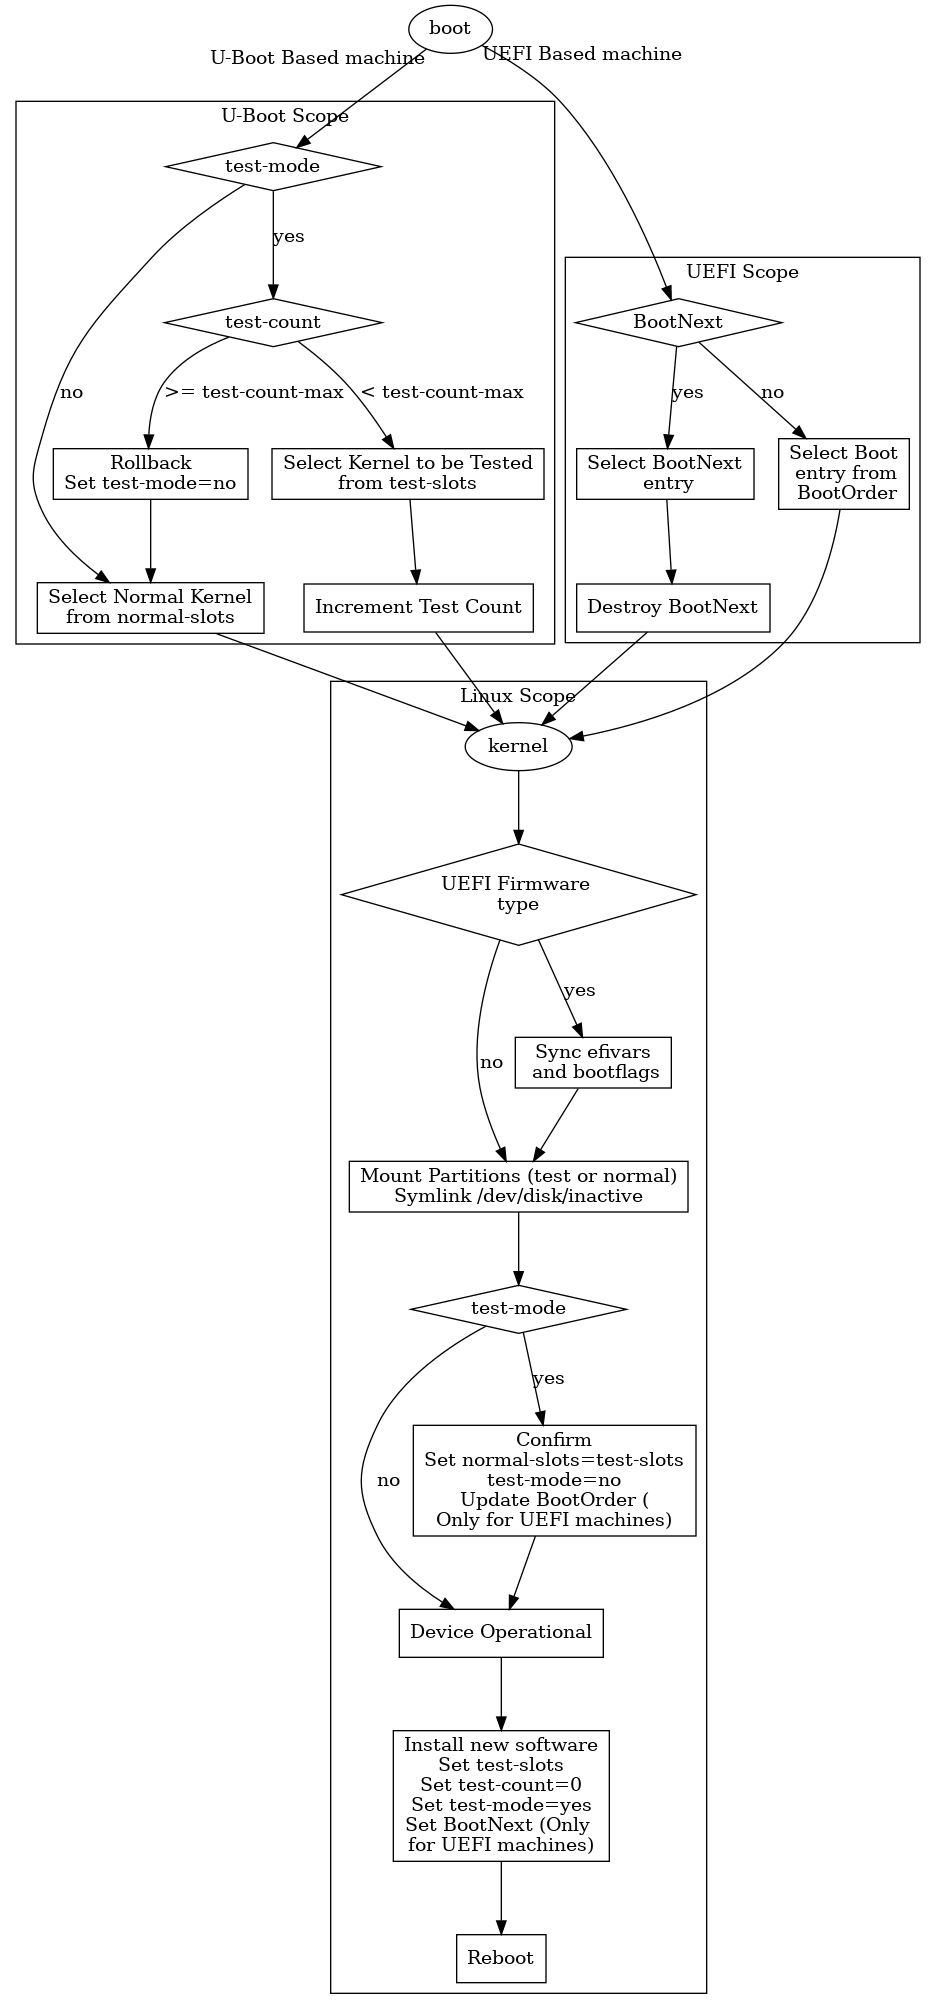
The underlying mechanism for installing software updates is either:
Linux Userspace
At boot time:
- The initramfs mounts
sysro,appro - udev: creates links
/dev/disk/inactive/{boot,sysro,appro}, based on bootflags and/etc/welma-partitions.conf - systemd: starts
updated
Swupdate
Installation: Simplified message sequence chart (not all D-Bus exchanges are shown):
Application                        updated daemon           SWUpdate daemon
(user)                                (root)                   (root)
│                                        │                        │
├── updatectl install SWU-1 SWU-2        │                        │
│      │                                 │                        │
│      │              (D-Bus)            │                        │
│      ├─────────InstallLocalFile ──────>│                        │
│      │               SWU-1             ├── swupdate-client      │
│      │                                 │   │                    │
│      │                                 │   │      (socket)      │
│      │                                 │   └───────────────────>│
│      │                                 │                        ├── install
│      │              (D-Bus)            │                        │   to disk
│      ├─────────InstallLocalFile ──────>│                        │
│      │               SWU-2             ├── swupdate-client      │
│      │                                 │   │                    │
│      │                                 │   │      (socket)      │
│      │                                 │   └───────────────────>│
│      │              (D-Bus)            │                        ├── install
│      ├──────────SubmitUpdate──────────>│                        │   to disk
│<─────┘                                 ├── write bootflags      │
│                                        │                        │
................... reboot ...........................................
│                                        │
├── updatectl confirm                    │
│      │                                 │
│      └────────────ConfirmUpdate───────>│
SWU modules generated at build time:
$DEPLOY_DIR_IMAGE/$IMAGE_LINK_NAME.boot.swu
$DEPLOY_DIR_IMAGE/$IMAGE_LINK_NAME.sysro.swu
$DEPLOY_DIR_IMAGE/$IMAGE_LINK_NAME.appro.swu
These are CPIO archives with:
- a
sw-descriptionfile (see https://sbabic.github.io/swupdate/sw-description.html for the syntax). - a file system image (vfat, ext4 or verity)
A SWU module for Welma should comply with the following:
- Images shall have a target device of the form
/dev/disk/inactive/{boot,sysro,appro}
The template of the sw-description file contained in the SWU module looks
like this:
software =
{
    version = "1.0"
    hardware-compatibility = [ "1.0" ]

    images = (
        {
            device = "/dev/disk/inactive/$partname"
            filename = "$image_file"
            installed-directly = true
        }
    )
}
($partname being replaced at build-time with boot, sysro or appro)
Mender
In the diagrams below, /u/s/m/m/v3 is a shorthand for
/usr/share/mender/modules/v3.
Installation in standalone mode: Simplified message sequence chart (not all D-Bus exchanges are shown):
Application                               updated daemon
(user)                                       (root)
│                                               │
├── updatectl install MENDER1 MENDER2           │
│      │                                        │
│      ├────────────InstallLocalFile───────────>│
│      │                MENDER1                 ├── mender install MENDER1
│      │                                        │   └── /u/s/m/m/v3/welma
│      │                                        │       └── write to disk
│      ├────────────InstallLocalFile───────────>│
│      │                MENDER2                 ├── mender install MENDER2
│      │                                        │   └── /u/s/m/m/v3/welma
│      │                                        │       └── write to disk
│      ├─────────────SubmitUpdate──────────────>│
│<─────┘                                        ├── write bootflags
│                                               │
└── reboot                                      │
................... reboot ......................
│                                               │
├── updatectl confirm                           │
│      │                                        │
│      └────────────ConfirmUpdate──────────────>│
Installation in connected mode: Simplified message sequence chart (not all D-Bus exchanges are shown):
Mender daemon                                     updated daemon
  (root)                                              (root)
    │                                                    │
    ├── download artifact                                │
    ├── /u/s/m/m/v3/welma ArtifactInstall                │
    │   │                                                │
    │   ├── write to disk BOOT                           │
    │   ├───────────── MarkSlotUpdated BOOT ────────────>│
    │   │                                                │
    │   ├── write to disk SYSRO                          │
    │   ├────────────── MarkSlotUpdated SYSRO ──────────>│
    │   │                                                │
    │   ├── write to disk APPRO                          │
    │   ├────────────── MarkSlotUpdated APPRO ──────────>│
    │   │                                                │
    │   └────────────────SubmitUpdate───────────────────>│
    └── reboot                                           │
........................ reboot .............................
    │                                                    │
    ├── /u/s/m/m/v3/welma ArtifactVerifyReboot           │
    │                                                    │
    ├── /u/s/m/m/v3/welma ArtifactCommit                 │
    │   └───────────────ConfirmUpdate───────────────────>│
    │                                                    │
How an application can control downloads and installation in connected mode:
Mender daemon                  updated daemon          application
    │                              │                        │
  detects that a module            │                        │
  is ready for download            │                        │
    │                              │                        │
    ├── Download_Enter_01          │                        │
    │   │                          │                        │
    │   ├── RequestClearance ─────>│                        │
    │   │       "download"         ├─ ClearanceRequested ──>│
    │   │                          │       "download"       │
    │   │                          │                        │
    │   │                          │<─── NotifyClearance ───┤
    │   │                          │        "ready"         │
    │   │<──── reply "ready" ──────┤                        │
    │   │                          │                        │
    │<──┘ exit code 0              │                        │
    │                              │                        │
  installation sequence            │                        │
  (same as before)                 │                        │
    │                              │                        │
Here is a summary of what a Mender artifact looks like:
├── header
├── payload 0000
│   └──files
│      └── ...
├── payload 0001
│   └── files
│       └── ...
└── ...
To be compatible with Welma update, a Mender artifact for Welma should comply with the following:
- Have exactly one payload of type
welma - The payload shall have:
- One or more file(s)
boot,sysroorappro:- The name indicates where it should installed (destination partition)
- The contents indicates the name of the image file to be installed
- The file(s) referenced by the above
- One or more file(s)
Notes
- The payload can contain either combination of BOOT, SYSRO, APPRO.
- Be sure to have enough disk space in /var/lib as Mender extracts payloads into this directory before installing to /dev/disk/inactive.
See also: